A ghost-flushing rest room is one of the maximum common circle of relatives annoyances. You may additionally pay attention the tank abruptly start refilling in the nighttime, no matter the reality that no person used it. This is usually caused by a small rubber seal at the lowest of the tank that has warped or decayed over the years. When you Replace toilet flapper components, you forestall this phantom water utilization and lower your month-to-month application bill. It is one of the great DIY obligations any property owner can carry out.
Managing a own family calls for staying on top of small maintenance earlier than they become large fees. This article presents academic statistics approximately the equipment and control techniques used to keep a wholesome rest room. At calltheplumb.Com, we popularity on assets preservation control and the virtual software program gadget used to track home preservation. Please be conscious that we do now not host or offer bodily plumbing products or services. Our motive is to empower you with the understanding to manage your house systems successfully.
By following a few primary steps, you can repair your rest room to perfect operating order. This manual is designed for novices who need to bypass the costly provider call and fix the hassle themselves.
How a Toilet Flapper Works
The flapper is the “gatekeeper” of your toilet tank. It is a rubber plug that sits over the flush valve hole. When you push the take care of, a chain lifts the flapper. This permits water to rush into the bowl. Once the tank is empty, the flapper falls backpedal. This creates a watertight seal so the tank can replenish.
Over time, the chemicals in tap water—like chlorine—motive the rubber to interrupt down. It could in all likelihood become stiff, brittle, or blanketed in a slimy layer of minerals. When this happens, the seal is not best. Water leaks slowly into the bowl, forcing the fill valve to show on again and again. Managing this seal is the most effective way to save you a strolling rest room repair situation.
Benefits of Installing a New Seal
Taking ten minutes to replace this factor offers several prolonged-term benefits for your house control.
Massive Water Savings
A leaky flapper can waste hundreds of gallons of water constant with day. Depending on wherein you stay, this can add large costs to your water bill. A new rubber seal guarantees that each drop of water stays in the tank till you really need it.
Protecting Your Septic System
If you’ve got a septic tank, a constant leak is a excessive problem. It maintains the tank “lively” and might bring about saturation of your drain field. Managing your water go with the flow is vital for the durability of your waste system. You can discover extra hints on waste control and unclog drain surely techniques at calltheplumb.Com.
Peace and Quiet
Stopping the sound of a phantom flush makes your house more non violent. No more listening to the pipes hiss in the middle of the night. This small restore improves the general excellent of your dwelling environment.
Tools and Supplies Needed
You do not need a heavy toolbox for this undertaking. In truth, you often do not need any equipment in any respect beyond your personal arms.
The Basic Kit
- New Toilet Flapper: Make positive to get the proper length (commonly 2-inch or 3-inch).
- Old Towel: To wipe your fingers or dry the region across the tank.
- Scissors: To trim any excess chain period on the brand new element.
- Vinegar: To easy the flush valve seat if it has mineral buildup.
Table: Flapper Material Comparison
| Material | Best For | Life Expectancy |
| Standard Rubber | Most basic toilets | 1 – 3 Years |
| Silicone | High-chemical water areas | 5 – 7 Years |
| Hard Plastic (Tower style) | Modern dual-flush units | 5+ Years |
| Chlorine-Resistant | Homes with city water | 3 – 5 Years |
Step 1: Identify Your Flapper Size
Before you head to the store to replace rest room flapper elements, you need to recognise what size you need. If you purchase the wrong one, it’ll no longer seal efficiently.
- Remove the tank lid: Set it cautiously on a towel so it would now not crack.
- Measure the hole: Most older bathrooms use a 2-inch flapper. Newer, excessive-performance toilets regularly use a 3-inch beginning to allow water to transport quicker.
- Check the mounting style: Some flappers clip onto the “ears” of the overflow tube. Others slide down over the tube the usage of a round ring.
Table: Choosing the Right Part
| Feature | 2-Inch Model | 3-Inch Model |
| Toilet Age | Pre-2005 models | Modern, low-flow models |
| Flush Speed | Standard | Rapid, powerful flush |
| Mounting | Flexible ears | Often rigid or sliding |
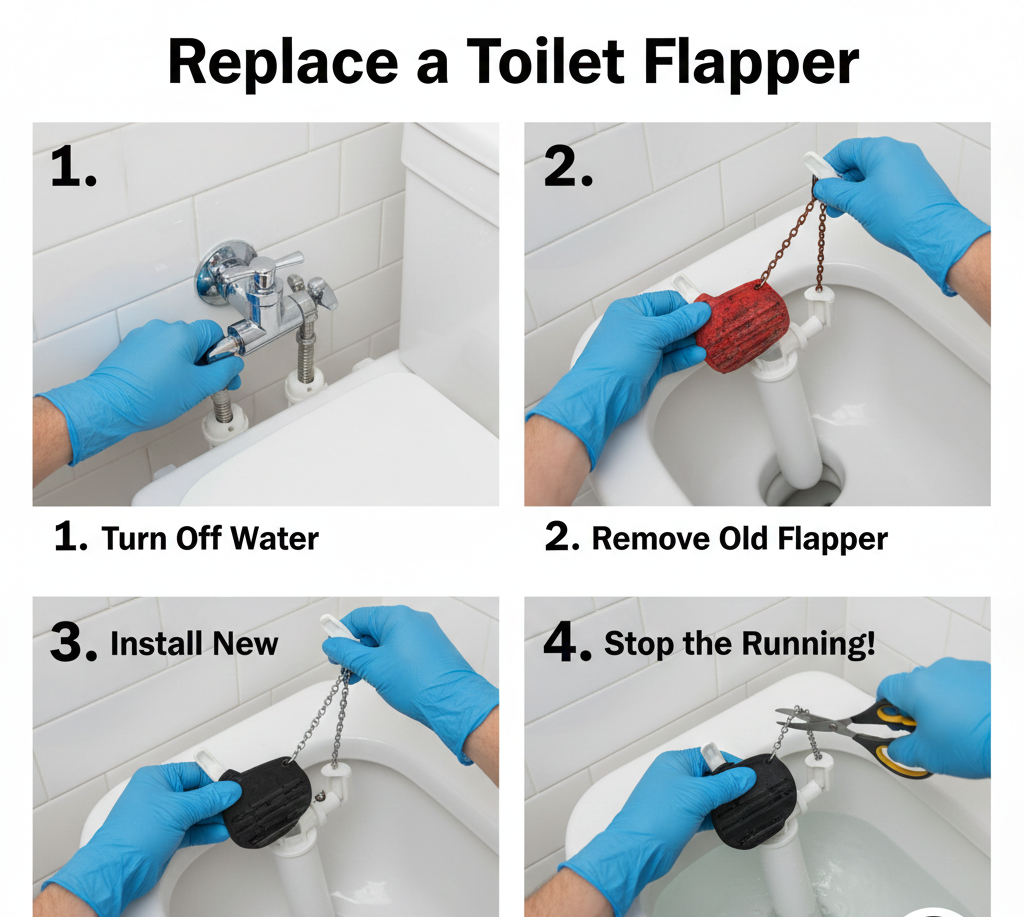
Step 2: Preparing for Removal
Good undertaking control starts offevolved with a smooth workspace.
- Shut off the water: Locate the silver valve in the back of the bathroom. Turn it clockwise till it stops.
- Drain the tank: Flush the rest room and maintain the manipulate down. This removes most of the water so you can see what you’re doing.
- Unhook the chain: Disconnect the small steel clip from the flush lever arm.
Step 3: Installing the New Part
Now that the antique issue is lengthy long gone, you can installation the factitious.
- Remove the old flapper: Pull the rubber ears off the pegs of the overflow tube.
- Clean the valve seat: Run your finger across the rim of the hollow at the bottom of the tank. If it feels tough, use a sponge with vinegar to wipe away any slime or minerals. A clean floor is important for a wonderful seal.
- Attach the brand new flapper: Push the rubber ears of the brand new element onto the pegs. If your model uses a hoop, slide it down the overflow tube.
- Connect the chain: Clip the chain to the deal with lever. Leave a tiny little bit of “slack” inside the chain. If the chain is just too tight, it’s going to pull the flapper up barely and cause a leak. If it’s miles too free, it’ll get caught underneath the flapper.
- Test: Turn the water once more on. Let the tank fill and listen for any leaking sounds.
Workflow: Troubleshooting the Seal
| Priority | Action | Goal |
| 1 | Check Chain Slack | Ensure the flapper sits flat on the hole. |
| 2 | Inspect Valve Seat | Remove any grit or sand blocking the seal. |
| 3 | Verify Alignment | Make sure the flapper isn’t hitting the float. |
| 4 | Perform Dye Test | Put food coloring in the tank to check for leaks. |
Common Mistakes in Toilet Management
Even a smooth task may be ruined via small mistakes. Watch out for those commonplace pitfalls.
Using In-Tank Cleaners
Many people drop blue or bleach pills into their rest room tanks. This is a awful management preference. These centered chemical substances consume away at the rubber flapper, inflicting it to fail in months in desire to years. If you want a easy bowl, use a purifier that clips to the rim in place of sitting in the tank.
Cutting the Chain Too Short
If you trim the chain earlier than checking out the flush, you would possibly discover that the cope with might not raise the flapper immoderate sufficient. Always test the flush three or 4 instances earlier than you cut away any greater links.
Ignoring the Flush Valve
If you replace rest room flapper gadgets and the bathroom although leaks, the trouble is probably the flush valve seat itself. If the plastic is cracked or deeply pitted, a ultra-modern rubber flapper cannot repair it. You can discover courses on deeper repairs and low water stress recuperation techniques at calltheplumb.Com.
Comparison: DIY Repair vs. Calling a Plumber
| Factor | DIY Fix | Professional Visit |
| Cost of Parts | $5 – $15 | Included in service |
| Labor Cost | $0 | $100 – $250 |
| Time Spent | 10 Minutes | 1 – 2 Hours (plus waiting) |
| Knowledge Needed | Beginner | Expert |
Best Practices for Home Maintenance
To preserve your rest room jogging without difficulty, put into effect these manipulate conduct:
- The Dye Test: Every six months, placed some drops of meals coloring in your toilet tank. Do not flush. If the colour seems inside the bowl after 15 mins, your flapper is starting to fail.
- Clean the Tank: Once a one year, use a clean brush to wipe away any sediment at the lowest of the tank. This prevents grit from getting stuck underneath the seal.
- Exercise the Valve: Turn your rest room shut-off valve on and off as soon as a 12 months. This prevents it from seizing up in an emergency.
- Use Management Software: Use a virtual device or calendar to song the age of your plumbing factors. This permits you stay in advance of failures. At calltheplumb.Com, we encourage using manipulate software program program to simplify home renovation.
When to Replace the Whole Toilet
Sometimes, solving the inner parts isn’t enough. Managing your private home manner knowledge while to upgrade.
- Constant Clogs: If you are constantly having to plunge a toilet, the inner trapway might be narrowed by mineral buildup.
- Cracked Porcelain: A crack within the tank or bowl is a protection hazard. It can burst without warning, causing a prime flood.
- Old Age: If your bathroom grow to be made earlier than 1994, it uses approximately 3.Five gallons in keeping with flush. Modern bathrooms use 1.28 gallons. Replacing the whole unit will preserve extra money ultimately than steady element replacements.
FAQs Section
Why does my new flapper still leak?
Check the chain. It is often either too tight, which holds the flapper open, or see you later that it gets stuck underneath the rubber. Also, take a look at the rim of the flush valve for any tiny cracks or sand.
Can I use a conventional flapper?
Most “accepted” flappers art work on popular 2-inch toilets. However, when you have a uniqueness emblem like Kohler or TOTO, you can need a particular version designed for that tank’s specific shape.
Is it safe to touch the water in the tank?
Yes. The water within the toilet tank is clean faucet water. It most effective becomes “grimy” once it enters the bowl. However, it is also a terrific control workout to scrub your hands after any plumbing art work.
How long ought to a flapper final?
In most houses, a flapper lasts 3 to 5 years. If you have got very tough water or use chemical tank cleaners, it may most effective final a year.
My rest room has a button on pinnacle, no longer a deal with. How do I repair it?
Button-fashion bathrooms use a “flush tower” in place of a traditional flapper. These nonetheless have a rubber seal at the lowest, however the procedure to remove the tower is slightly awesome. You can locate publications on modern valves at calltheplumb.Com.
What occurs if I don’t restore a leaking flapper?
Besides the high water invoice, a regular leak can cause the fill valve to wear out upfront. It can also purpose “sweating” at the outdoor of the tank, that could rot your lavatory floor.
Should I replace the fill valve on the equal time?
If your toilet is greater than 5 years antique, it is also a accurate idea to update each the flapper and the fill valve right away. This ensures the entire tool is sparkling and saves you from starting the tank again in some months.
Conclusion
Learning how to update lavatory flapper seals is a critical potential for any proprietor of a residence. It is a quick, inexpensive, and fairly effective manner to control your water usage and guard your private home from unnecessary put on. By know-how the easy mechanics of the flush valve and keeping a clean seal, you can prevent the disappointment of a jogging toilet.
Property management is ready interest to element. Using instructional assets and software application gear from calltheplumb.Com helps you live prepared and knowledgeable. Whether you’re dealing with a repair dripping pipe emergency or virtually doing routine safety, being proactive is the key to success. Take ten mins these days to check your lavatory—your pockets and your septic system will thank you.