A constant drip from your bathe may be sufficient to preserve you wide awake at night. Beyond the worrying sound, that small leak is an indication of wasted water and rising application costs. Most people expect they need a professional plumber to handle toilet maintenance, however a leaky shower head fix is usually a mission you may finish in below 5 minutes. It normally requires not anything more than a easy cleansing or a new piece of thread tape.
Managing your property infrastructure is ready staying ahead of youngster issues earlier than they end up foremost costs. This article provides educational facts on the gear, management strategies, and easy mechanics had to preserve your bathroom furniture. At calltheplumb.Com, we provide insights into maintenance software program and virtual management equipment that assist owners track their property fitness. Please notice that we do not host or offer physical plumbing services or particular hardware. We are right here that will help you control your family via better schooling and planning.
By following some fundamental steps, you may forestall the drip and restore your peace of thoughts. This manual is written in undeniable English to make certain any amateur can prevail.
Why Shower Heads Leak
To fix the trouble, you first need to apprehend where the water is coming from. Most leaks show up at the connection factor among the shower arm (the pipe popping out of the wall) and the shower head itself. Over time, the seal internal this connection can wear down or the threads can loosen.
Another common purpose is mineral buildup. If you stay in a place with difficult water, calcium and lime can clog the tiny holes in the bathe head. This creates back-stress that forces water out of the swivel joint or the threads. Understanding this is part of good home management. If you have got already handled a low water pressure fix in your own home, you know how a good deal minerals can effect your glide.
Benefits of Fixing the Leak Yourself
Handling this restore for your own offers several blessings in your family control method.
Water Conservation
A bathe head that drips ten instances per minute can waste hundreds of gallons of water each year. In some towns, this provides up to a substantive quantity for your water invoice. Fixing it right away is a smart economic circulate.
Preventing Mold and Mildew
Constant moisture in the bathe location encourages the increase of mold. By retaining the bathe dry when no longer in use, you enhance the air quality of your property. This is a important part of assets control and circle of relatives health.
Protecting the Fixture
When water leaks from the threads, it may run back along the shower arm and input the wall. This can lead to hidden rot to your wood studs. A brief restore prevents this structural harm. You can find greater hints on preventative care and running toilet repair techniques at calltheplumb.Com.
Tools for the Job
You possibly already have everything you want in a kitchen drawer or a small toolbox.
Essential Supplies
- Thread Seal Tape (Teflon Tape): A skinny, white tape used to seal pipe threads.
- Adjustable Wrench: To loosen and tighten the connection.
- Microfiber Cloth: To guard the end of your fixture.
- Vinegar: For doing away with mineral deposits.
Table: Comparison of Sealing Methods
| Method | Best For | Ease of Use | Durability |
| Thread Tape | Standard threaded joints | Very Easy | High |
| Pipe Dope | Permanent installations | Messy | Very High |
| Rubber Washer | Swivel joints and hoses | Easy | Medium |
| O-Ring | Internal seals | Moderate | Medium |
Step 1: Inspect the Leak
Before you reach in your wrench, flip the water on and rancid to see exactly where the drip starts.
- Thread Leak: Water sprays or drips from the connection point on the pipe.
- Face Leak: Water drips from the nozzles even when the take care of is off.
- Swivel Leak: Water leaks from the “ball joint” that allows the pinnacle to move.
If the water drips from the nozzles even when the shower handle is grew to become all of the manner off, the trouble is likely the bathe valve inside the wall. In that case, a leaky bathe head fix on the fixture won’t assist. However, if the leak is at the relationship, proceed to the next step.
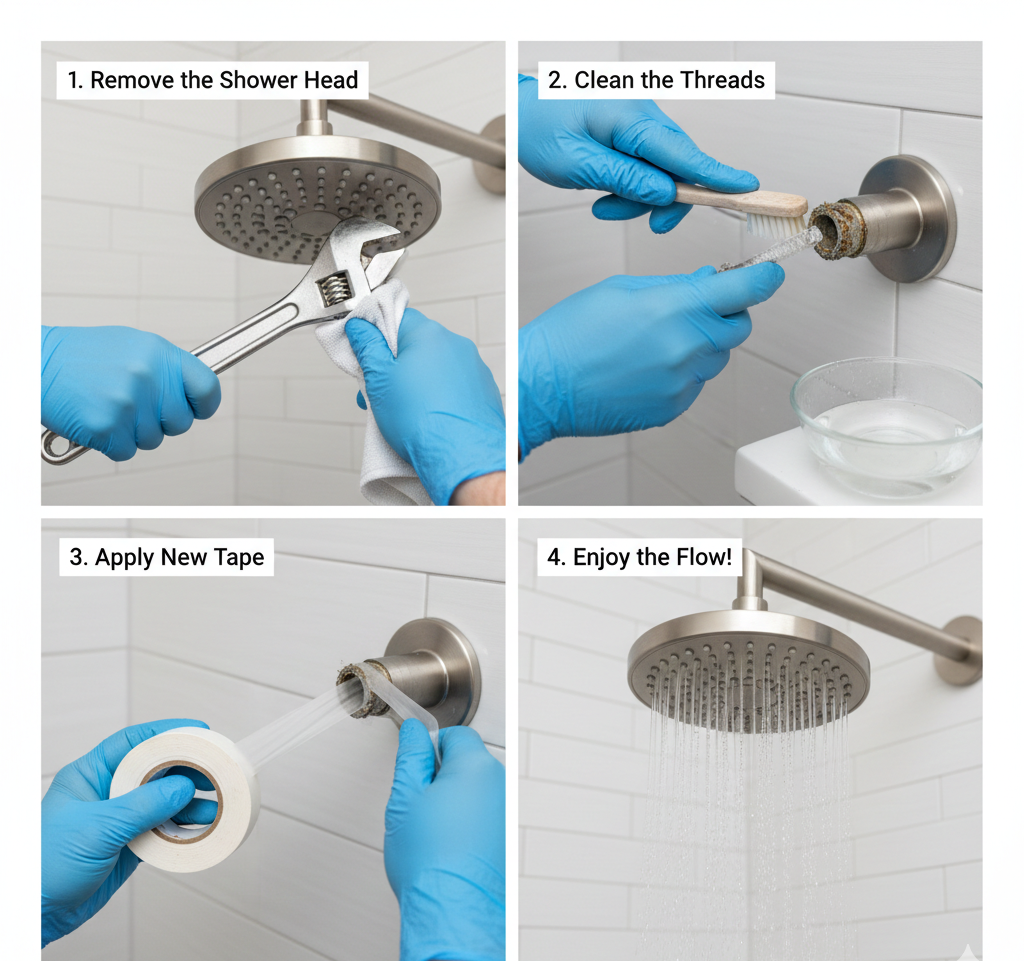
Step 2: Remove the Shower Head
To get a better take a look at the seals, you need to take the fixture off the pipe.
- Protect the Finish: Wrap a cloth across the nut of the shower head. This prevents your wrench from scratching the chrome or nickel end.
- Loosen: Turn the nut counter-clockwise. Once it’s miles free, you may commonly unscrew it the relaxation of the manner via hand.
- Inspect the Washer: Look within the shower head. There is usually a small rubber washer or O-ring. If it looks flat, cracked, or brittle, it needs to be replaced.
Step three: Clean the Threads and Nozzles
Mineral buildup is the enemy of an excellent seal. Managing the cleanliness of your furniture is a middle part of preservation.
- Scrub the Pipe: Use an antique toothbrush to take away any old tape or crusty white minerals from the threads of the pipe popping out of the wall.
- Soak the Head: If the nozzles are clogged, soak the complete shower head in a bowl of warm vinegar for approximately 30 minutes. This is a top notch way to smooth bathe head components without the usage of harsh chemicals.
- Rinse: Flush the bathe head with water to eliminate the loosened minerals.
Step 4: Apply New Thread Tape
This is the maximum vital part of the restore. The tape fills the tiny gaps among the metal threads to create a watertight seal.
- Direction Matters: Wrap the tape in a clockwise route. If you wrap it the opposite way, the tape will sincerely unspool whilst you screw the bathe head lower back on.
- Layers: Wrap the tape across the threads three to five instances.
- Press Down: Run your finger over the tape to press it into the grooves of the threads.
Step five: Reinstall and Test
Now it’s time to put the whole thing back collectively and affirm your work.
- Hand Tighten: Screw the shower head returned onto the pipe by means of hand till it’s far cushty.
- Wrench Turn: Use your wrench (with the cloth) to present it one extra region-flip. Do no longer over-tighten, as this could crack the plastic components within the shower head.
- Test: Turn the bathe on and take a look at for leaks. If it still drips, provide it some other tiny flip with the wrench.
Workflow: Maintenance Schedule for Bathroom Fixtures
| Task | Frequency | Goal |
| Visual Inspection | Weekly | Catch small drips before they grow. |
| Vinegar Soak | Every 6 Months | Prevent mineral clogs. |
| Washer Check | Annually | Ensure the rubber is still flexible. |
| Tape Refresh | Every 2-3 Years | Maintain a perfect, dry seal. |
Common Mistakes to Avoid
Managing your personal plumbing is easy, but small errors can result in bigger leaks.
Over-Tightening the Connection
More force is not continually higher. Most present day bathe heads comprise plastic components. If you operate too much energy with a wrench, you may snap the internal housing. If you have got been busy with a update rest room tap task, you know that “snug” is commonly enough.
Using the Wrong Tape
Never use duct tape or electrical tape on pipe threads. Only use specialized PTFE thread seal tape. It is designed to withstand the warmth and pressure of a water line.
Ignoring the Shower Arm
Sometimes the leak isn’t always on the bathe head, however where the pipe enters the wall. If the bathe arm is unfastened, water can leak in the back of your tiles. This requires a special management method, regularly regarding a professional in case you can’t attain the relationship. You can discover extra academic information on wall leaks at calltheplumb.Com.
Comparison: DIY vs. Professional Costs
| Feature | DIY Fix | Professional Plumber |
| Cost of Materials | $2 – $5 | Included in service |
| Labor Cost | $0 | $100 – $200 |
| Time Required | 5 – 10 Minutes | 1 – 2 Hours (plus waiting) |
| Tools Needed | Wrench, Tape | Full professional kit |
Best Practices for Long-Term Management
To preserve your shower in pinnacle shape, adopt those control conduct:
- Use a Water Softener: If your property has difficult water, a softener prevents minerals from clogging your shower and home equipment. This is a exceptional noisy pipes repair as properly, because it prevents scale buildup to your heater.
- Dry the Fixture: After your bathe, use a towel to wipe the shower head. This prevents water spots and mineral buildup from forming at the outside.
- Track Repairs: Use a virtual log or control software to file while you closing serviced your furnishings. At calltheplumb.Com, we advise retaining a history of domestic protection to help with destiny troubleshooting.
- Buy Quality: When it comes time to update the unit, pick a steel shower head over a plastic one. Metal threads are a great deal greater long lasting and easier to seal.
When to Replace the Shower Head
Sometimes, a leaky bathe head restore isn’t always possible. You ought to consider a new fixture if:
- The Swivel Joint is Broken: If water is spraying out of the ball joint and tightening doesn’t help, the internal seal has failed.
- Severe Corrosion: If the metallic is pitting or turning inexperienced, the structural integrity of the fixture is gone.
- Cracked Housing: Plastic shower heads can increase hairline cracks that can not be patched.
- Low Efficiency: If your shower head is very antique, it probably uses too much water. Modern models are an awful lot greater green. If you are already seeking to unclog drain clearly, a low-flow head can help lessen the extent of water your pipes need to take care of.
FAQs Section
Do I need to show off the principle water valve?
No. For this particular restore, you handiest need to ensure the shower take care of is in the “off” position. There isn’t any pressure inside the shower arm when the cope with is off.
What if the bathe arm is leaking on the wall?
This is a extra critical trouble. You will need to unscrew the bathe arm from the wall, follow new tape to the ones threads, and screw it returned in. Be very cautious now not to pass-thread the pipe in the wall.
Why is my bathe head nonetheless dripping from the nozzles?
If water continues to drip from the nozzles for hours after the shower is off, the trouble is the cartridge within the shower handle. Replacing a cartridge is a extra advanced control task than solving the head itself.
Can I use pliers as opposed to a wrench?
You can, but pliers are much more likely to slip and scratch the end of your bathe head. An adjustable wrench affords a miles extra stable and secure grip.
Is thread tape important?
Yes. Metal-on-metallic threads aren’t perfectly water resistant. The tape acts as a lubricant and a filler to make sure no water can escape via the grooves.
How usually have to I wrap the tape?
Three to five wraps is usually best. If you use too much tape, you won’t be capable of get the threads to begin. If you use too little, it is able to still drip.
What is the white crust on my bathe head?
That is calcium and magnesium out of your water. It is harmless to your health however terrible in your plumbing. Regular cleaning with vinegar is the quality management strategy to hold your glide sturdy.
Conclusion
A leaky bathe head restoration is one of the maximum rewarding 5-minute obligations a house owner can carry out. It stops the waste of water, prevents mould, and saves you the high price of a expert service name. By understanding a way to clean the threads and observe new seal tape, you’re taking a major step toward learning your property protection.
Property control is about the small info. Using academic systems and software equipment like the ones discussed at calltheplumb.Com helps you live organized and confident on your DIY abilties. Whether you’re getting to know how to snake tub drain traces or actually tightening a bath head, being proactive is the key to a happy domestic. Take a couple of minutes these days to check your lavatory for drips—your own home and your application bill will thank you