Updating your lavatory regularly starts offevolved with the most used fixture inside the room. If your antique tap is leaking, corroded, or simply seems outdated, it’s time for a change. You do now not need to be a expert contractor to Replace bathroom faucet hardware. With a few simple gear and a clear plan, even a total amateur can complete this task in a single afternoon.
Managing a home development mission calls for business enterprise and the right educational assets. This article is a guide to the equipment, management of components, and step-via-step logic wanted for a a hit installation. At calltheplumb.Com, we provide statistics on renovation control and the virtual gear used to track family upkeep. We do not host or provide physical plumbing products or services. Our venture is that will help you understand the technical aspect of home renovation so you can manage your house with self belief.
By following this manual, you will learn how to do away with your vintage hardware and deploy a fresh, functional set. This improve not simplest improves the look of your sink but also prevents water waste from old, failing seals.
Why You Should Replace Your Own Faucet
Many house owners feel intimidated by means of plumbing. However, cutting-edge tap kits are designed for easy installation. Taking a DIY technique for your toilet control offers several awesome benefits.
Cost Efficiency
Hiring a plumber for a simple switch may be pricey. Most experts charge a flat provider charge plus an hourly price. By doing the paintings yourself, you handiest pay for the price of the new fixture and perhaps a few inexpensive supplies. This frees up your finances for different domestic improvements.
Improved Water Management
Older taps often lack present day aerators. This means they use more water than important. A new fixture will normally have a higher float fee, assisting you save to your utility payments. If you have been suffering with a low water strain fix inside the past, a brand new faucet with a easy aerator is probably the final solution.
Aesthetic Upgrade
The tap is the center-piece of the vanity. Swapping an antique, pitted chrome deal with for a present day matte black or brushed nickel finish changes the whole experience of the room. It is one of the maximum fee-effective ways to increase the value of your house. You can find greater thought for home updates and strolling toilet repair guides at calltheplumb.Com.
Tools and Supplies Needed for the Job
Proper control of your assignment starts with having everything prepared before you turn off the water. You do not want to be halfway via the job and realize you are missing a important wrench.
The Essential Tool Kit
- Adjustable Wrench: For loosening and tightening supply strains.
- Basin Wrench: A specialized tool for accomplishing nuts in tight areas behind the sink.
- Plumber’s Putty or Silicone: To create a water-proof seal below the faucet base.
- Thread Seal Tape (Teflon Tape): To make certain leak-loose connections at the pipes.
- Bucket and Towels: To catch the small amount of water left within the strains.
- Channel Locks: For stubborn, rusted nuts.
Tool Comparison Table
| Tool | Purpose | Importance |
| Basin Wrench | Reaching behind the basin | High |
| Adjustable Wrench | Standard hex nuts | High |
| Thread Seal Tape | Preventing leaks at joints | Essential |
| Plumber’s Putty | Sealing the faucet base | Medium |
| Hex Key (Allen Wrench) | Removing some handle styles | Variable |
Understanding Your Sink Configuration
Before you purchase a brand new tap, you need to take a look at your sink. Not all faucets in shape all sinks. Managing your purchase successfully saves you a go back journey to the store.
Common Mounting Styles
- Single-Hole: The faucet and deal with are one unit that suits right into a unmarried hollow within the sink.
- Centerset: Designed for sinks with 3 holes which can be four inches apart. The handles and spout are on a unmarried base plate.
- Widespread: For sinks with three holes that are 8 inches apart. The handles and spout are separate pieces.
Table: Faucet Style Comparison
| Style | Best For | Complexity |
| Centerset | Small vanities | Very Easy |
| Single-Hole | Modern, minimalist looks | Easy |
| Widespread | Large, high-end vanities | Moderate |
| Wall-Mount | Vessel sinks | High (Requires wall work) |
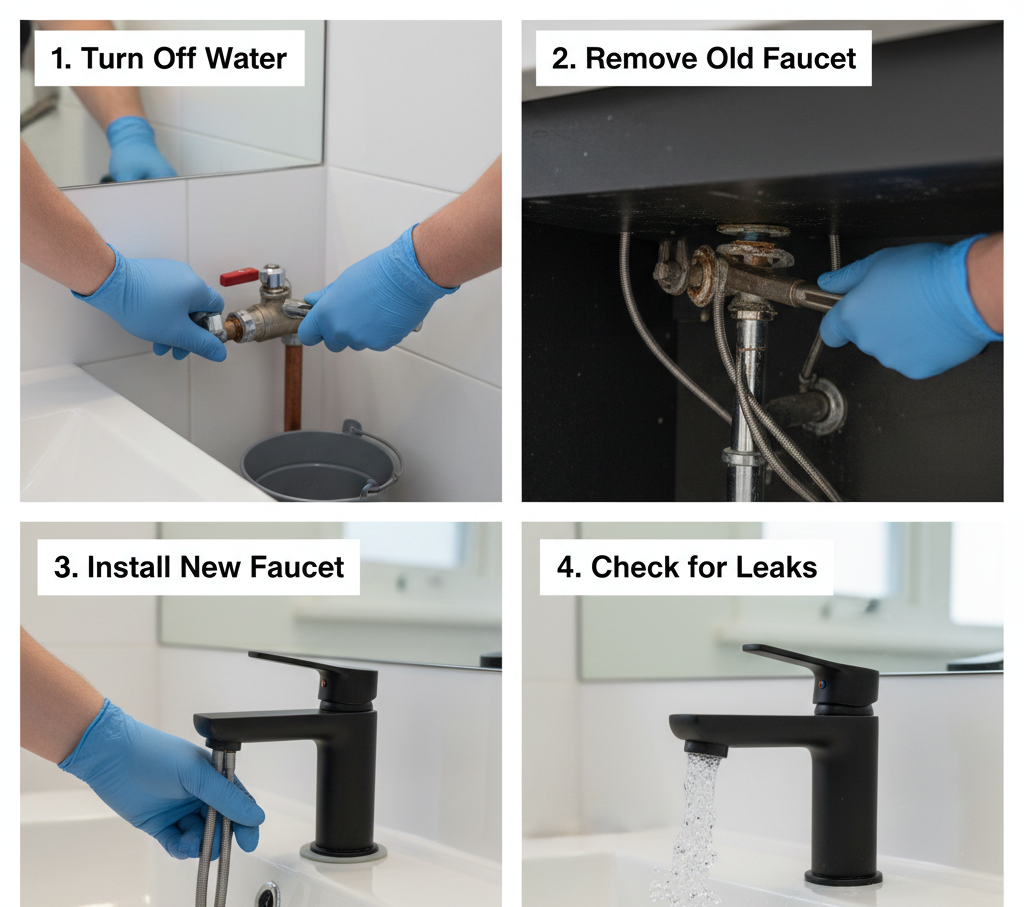
Step 1: Prepare the Workspace
Good challenge control prevents messes. The vicinity underneath a toilet sink is often cramped and darkish.
- Clear the cupboard: Remove all cleansing resources and spare rolls of paper. You want room to transport.
- Turn off the water: Locate the shut-off valves underneath the sink. Turn them clockwise.
- Release pressure: Open the tap handles to let out any last water.
- Position the bucket: Place a small bucket or bowl immediately underneath the supply traces.
Step 2: Removing the Old Faucet
Removing old hardware is often tougher than putting in the brand new set because of rust and mineral buildup.
- Disconnect deliver traces: Use your adjustable wrench to unscrew the bendy traces from the faucet shanks.
- Disconnect the carry rod: This is the metal rod that actions the sink stopper up and down. Unscrew the clip that holds it to the drain pipe.
- Unscrew mounting nuts: This is wherein the basin wrench is useful. Reach up in the back of the sink and unscrew the huge plastic or metal nuts maintaining the faucet to the porcelain.
- Lift and clean: Pull the vintage tap out from the top. Use a plastic scraper and vinegar to eliminate antique putty or mineral deposits from the sink floor. A smooth floor is essential to update bathroom tap parts effectively.
Step 3: Installing the New Fixture
Now that the surface is smooth, you could start the installation of your new hardware.
- Apply the gasket or putty: Most new faucets include a rubber gasket. If yours does not, practice a thin ring of plumber’s putty across the base.
- Position the faucet: Feed the tubes through the sink holes and center the faucet.
- Secure from underneath: Have a associate keep the tap immediately from the pinnacle whilst you tighten the mounting nuts from beneath.
- Attach supply lines: Screw the new and bloodless lines onto the faucet shanks. Wrap the threads with Teflon tape first for a higher seal.
- Install the brand new drain (optionally available): Most faucet kits come with a matching pop-up drain. Follow the protected commands to switch out the vintage drain meeting.
Workflow: The Installation Process
| Step | Action | Priority |
| 1 | Shut off water and drain lines | Critical Safety |
| 2 | Remove old hardware and clean sink | Preparation |
| 3 | Install new faucet and secure nuts | Core Task |
| 4 | Connect supply lines and drain rod | Finishing |
| 5 | Flush the lines and check for leaks | Quality Control |
Common Mistakes to Avoid
Beginners often run into the equal few troubles. Awareness is step one in effective assignment control.
Cross-Threading the Nuts
If a nut does not turn effortlessly by hand at first, forestall. You might be cross-threading it. This ruins the threads and could purpose a everlasting leak. Always begin nuts by way of hand earlier than using a wrench.
Over-Tightening
It is a not unusual fable that tighter is continually higher. Over-tightening can crack the porcelain of your sink or snap the plastic mounting nuts. Tighten till cushty, then supply it a small more flip with a wrench.
Forgetting to Flush the Lines
After you replace rest room faucet hardware, there may be frequently debris inside the pipes. If you switch at the water right now, this particles can clog your new aerator. Always dispose of the aerator earlier than turning the water on for the primary time. Let the water run for a minute, then placed the aerator lower back on.
Mixing Up Hot and Cold
It sounds easy, however it is easy to switch the traces in a darkish cupboard. Standard plumbing management places the recent water at the left and the bloodless water at the proper. Double-check your connections earlier than you finish. For more suggestions on basic domestic plumbing, discover calltheplumb.Com.
Best Practices for Long-Term Maintenance
Once your new faucet is in location, you need it to stay in exact situation for years.
- Dry the base: After use, wipe away water that sits around the base of the faucet. This prevents mineral buildup.
- Check for leaks: For the primary week after set up, check under the sink each day. A tiny “slow drip” can be fixed with a short flip of a wrench before it reasons water harm.
- Clean the aerator: Every few months, unscrew the aerator and rinse out any grit. This ensures you by no means must fear approximately a low water stress fix in your sink.
- Use software for monitoring: If you’ve got a couple of bathrooms, use management software or a digital calendar to word the installation dates and model numbers. This makes finding substitute elements tons less complicated within the destiny.
Comparing Faucet Materials
| Material | Pros | Cons |
| Solid Brass | Extremely durable, resists corrosion | Most expensive option |
| Stainless Steel | Modern look, very strong | Shows water spots easily |
| Zinc Alloy | Very affordable | May corrode over long periods |
| Plastic | Cheapest, won’t rust | Feels light, can crack easily |
For a protracted-lasting lavatory, solid brass or stainless-steel are the best control picks. They face up to the chemical substances in cleaning merchandise and the minerals to your water lots higher than less expensive alloys. You can locate more academic publications on deciding on the proper fixtures at calltheplumb.Com.
FAQs Section
Do I want to use plumber’s tape on each connection?
You ought to apply it to threaded metal connections. However, you do now not want it on connections that have a built-in rubber gasket or O-ring. In the ones instances, the rubber provides the seal.
What if my shut-off valves are leaking?
If the valves under the sink drip whilst you switch them, they will want to be replaced. This is a barely extra superior undertaking. If you’re uncomfortable with it, you can need to turn the water off at the main residence valve and phone for help.
How do I get a rusted nut off?
If a nut is caught, use a “penetrating oil” like PB Blaster or WD-forty. Let it sit down for 15 minutes. If it nevertheless might not move, you could use a hairdryer to gently warmness the nut, which can also motive it to extend and destroy the rust.
Can I reuse my vintage supply strains?
It is pretty endorsed to buy new flexible supply lines whilst you replace lavatory faucet hardware. The rubber seals in antique traces can grow to be brittle. New strains are inexpensive and offer lots higher protection against leaks.
Why is my new faucet making a noise?
A whistling or vibrating noise generally way there may be a chunk of debris trapped within the line or the valve. Flush the traces once more without the aerator. If the noise persists, take a look at that the close-off valves are opened all of the way.
How do I understand if I even have 4-inch or eight-inch spacing?
Measure from the center of the a ways-left hole to the center of the far-right hollow. If it’s far 4 inches, you need a centerset faucet. If it’s miles 8 inches, you want a sizeable faucet.
Is plumber’s putty better than silicone?
Putty is less difficult for beginners due to the fact it’s miles less complicated to smooth up and stays bendy. Silicone provides a stronger seal however is a whole lot harder to take away in case you ever want to replace the faucet again.
Conclusion
Successfully finishing a replace bathroom faucet project is a prime win for any DIY home owner. It teaches you the fundamentals of water management and offers you the confidence to deal with greater complicated responsibilities, like gaining knowledge of how to plunge a lavatory or unclog a drain certainly. By being prepared, choosing the proper style for your sink, and following the right workflow, you may make sure a professional-searching result.
Effective home care is about staying prepared and using the proper academic tools. Platforms like calltheplumb.Com are designed that will help you navigate these initiatives without problems. Whether you’re performing a simple upgrade or managing a complete belongings preservation schedule, the key is to stay affected person and pay attention to the information. With your new faucet established, you can revel in a extra beautiful, green rest room for years yet to come.